
For over a decade, I was stuck in a frustrating routine. Every single time I made an API call, whether it was a GET or a POST request, I had to manually add my session code into the HTTP headers. I’d always scratch my head and scream in frustration, “Why do I have to keep doing this?” I was constantly writing the same header over and over:
const options = {
headers: {
'Content-Type': 'application/json',
SessionId: this.user_session,
},
params: {
param: param,
},
};
Then, I finally heard about interceptors in Angular, and it solved this huge headache for me. Now, let me guide you through the simple way I resolved this big mess.
To begin, create a new file named Auth.interceptor.ts and put it in the correct folder.

Simple Auth Interceptor
import { Injectable } from "@angular/core";
import {
  HttpInterceptor,
  HttpRequest,
  HttpHandler,
  HttpEvent,
} from "@angular/common/http";
import { Observable } from "rxjs";
import { ApiService } from "./api.service";

@Injectable()
export class AuthInterceptor implements HttpInterceptor {
  constructor(private readonly service: ApiService) {}
  intercept(
    req: HttpRequest<any>,
    next: HttpHandler
  ): Observable<HttpEvent<any>> {
    const token = this.service.user_session;
    if (token) {
      req = req.clone({
        setHeaders: {
          "Content-Type": "application/json",
          SessionId: token,
        },
      });
    }

    return next.handle(req);
  }
}
In this new file, you can easily create a simple interceptor.
The @Injectable() line at the top is a note for Angular that tells it this class might use other services from your application.
How It Works
The most important part of the code is the intercept function. You can think of it as a checkpoint that inspects every API request before it leaves your app. This lets you change the request, like adding headers to it.
Here is the process step-by-step:
- Your app tries to send a request to the server.
- The
interceptfunction runs first, catching the request. - Inside the function, the code checks to see if a user’s login token exists.
- If it does, the code makes a copy of the request and adds the required headers to it.
- Finally, this new, modified request is sent on its way to the server
Advanced Auth Interceptor
import { Injectable } from "@angular/core";
import {
  HttpInterceptor,
  HttpRequest,
  HttpHandler,
  HttpEvent,
  HttpErrorResponse,
} from "@angular/common/http";
import { Observable, from, throwError } from "rxjs";
import { catchError, switchMap } from "rxjs/operators";
import { ApiService } from "./api.service";

@Injectable()
export class AuthInterceptor implements HttpInterceptor {
  private isRefreshing = false; // prevent multiple refresh calls

  constructor(private readonly service: ApiService) {}

  intercept(req: HttpRequest<any>, next: HttpHandler): Observable<HttpEvent<any>> {
    // Attach session ID
    const token = this.service.user_session;
    if (token) {
      req = req.clone({
        setHeaders: {
          "Content-Type": "application/json",
          SessionId: token,
        },
      });
    }

    return next.handle(req).pipe(
      catchError((error: HttpErrorResponse) => {
        if (error.status === 401 && !this.isRefreshing) {
          this.isRefreshing = true;
          // Call loginTo() to refresh the session token
          return from(this.service.loginTo()).pipe(
            switchMap(() => {
              this.isRefreshing = false;
              // Retry the original request with the new session token
              const newToken = this.service.user_session;
              const clonedReq = req.clone({
                setHeaders: {
                  "Content-Type": "application/json",
                  SessionId: newToken,
                },
              });
              return next.handle(clonedReq);
            }),
            catchError((err) => {
              this.isRefreshing = false;
              return throwError(() => err);
            })
          );
        } else {
          return throwError(() => error);
        }
      })
    );
  }
}
Much of the code is the same as before. The new logic focuses on what to do when a request fails.
Handling an Expired Session (401 Error)

If we send a request and the server responds with a 401 error, it usually means our session ID is old and has expired. When this happens, the code automatically tries to get a new session ID by calling the login function.
Because my login function is a “Promise” and this interceptor uses “Observables” (another way of handling asynchronous tasks), I use the from operator to convert the Promise into an Observable so they can work together.
After the conversion, we use pipe to chain a series of steps together. This lets us say, “After you get a new session ID, then do the following…”
Inside the pipe, we use switchMap. This operator is perfect for this situation because it takes the result from the first step (the new session ID) and then “switches” to a new task: retrying the original request that failed.
So, the process is:
- After getting the new session ID, we make another copy of the original request.
- We update this copy with the new session ID in the headers.
- Finally, we send this corrected request to the server to try again.
What if Refreshing Fails?
If any part of this process goes wrong (for example, if we can’t get a new session ID), we need to handle that error.
catchError: This operator works like a safety net inside thepipe. It catches any error that occurs. In this code, if we fail to get a new token, we just pass the original error along.throwError: We use this to make sure the error is properly reported to the rest of the application. Without it, the request might just fail silently, and the user would never know something went wrong.throwErrorensures the error is officially “thrown” so other parts of the app can see it.
Now for the most important part: telling your application to actually use the interceptor.
Update Your App Module
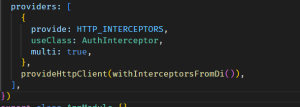
Go to your app.module.ts file and find the providers section. You need to add the configuration for your new interceptor there.
Add the following code to the providers array:
providers: [
    {
      provide: HTTP_INTERCEPTORS,
      useClass: AuthInterceptor,
      multi: true, // IMPORTANT: allows multiple interceptors
    },
    provideHttpClient(withInterceptorsFromDi()),
]
What This Code Does
This code registers your interceptor so Angular knows how to use it.
provide: HTTP_INTERCEPTORS: This is the official token that tells Angular, “I’m giving you an HTTP interceptor.”useClass: AuthInterceptor: This tells Angular which class to use as the interceptor.multi: true: This is very important. It allows you to have more than one interceptor in your application. If this wasfalse, this interceptor would overwrite any others.provideHttpClient(withInterceptorsFromDi()): This is the modern way to set up Angular’s HTTP client. It tells the client to automatically find and use any interceptors that you’ve registered in theprovidersarray.
After you save this file, you’re finished! 🎉
From now on, every API request from your app will automatically use the interceptor to add the session ID. You no longer have to manually add HTTP headers in every single class.
This will make your code much cleaner and less clumsy.

Tony
August 25, 2025Good tutorial